Foreign Foods in Japan –
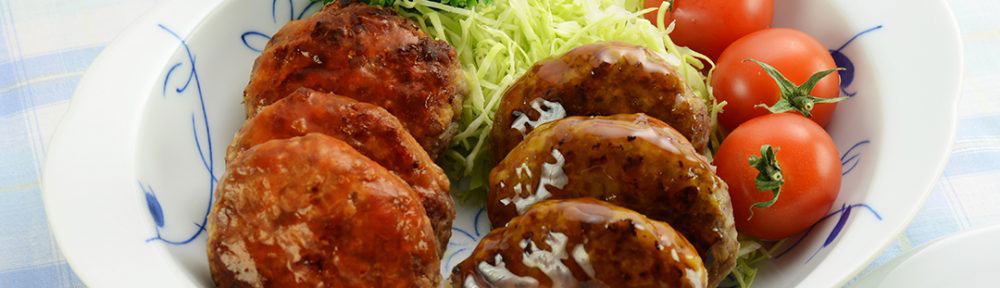
Hanbāgu!

“Haan-baa-ghu”.

It’s delicious. It’s uniquely Japanese. And it’s not a hamburger!

Hanbāgu!

Our Foreign Food this month is a delicious Japanized version of steak, with similarities to Salisbury Steak, Steak Tartare and the Hamburg steak from Germany. Hanbāgu is a ground meat patty made from beef and pork, served like a steak, topped with a sauce and typically accompanied by rice and vegetables. This type of chopped meat steak became popular in the United States in the late 1800s, when German immigrants from Hamburg came to live in American cities like Chicago and New York. They made a “steak” with chopped beef mixed with onions, garlic, salt and pepper and cooked until tender and juicy.

Eventually, these steak patties were adapted to be eaten between two pieces of bread, creating the modern American hamburger, and both the chopped beef steak and hamburger were brought to Japan during World War II with the influx of foreign soldiers into the country.

Hanbāgu patties

Hanbāgā evolved to become Japanese hamburgers – beef patties served with various toppings served in a bun. Hanbāgu evolved as a rich and savory steak dish, cooked by countless Japanese home cooks, becoming a favorite dish among children and adults.

Hanbāgu is made with a blend of beef and pork called aibiki. This mixture is commonly mixed at a ratio of 7:3 and is typically found prepackaged at Japanese stores. Into the meat are added sautéed onions, egg, panko breadcrumbs, milk, salt, pepper and nutmeg. The mixture is mixed by hand into a gruel-like consistency and formed into patties. The Japanese technique of forming the patties adds a special touch to the meat. The patties are tossed back and forth in the hands, removing air pockets and then indented on the middle to foster even cooking. The patties are also rested in the refrigerator prior to cooking, allowing the slow absorption of flavor from the seasonings.

Pan frying some Hanbāgu!

Once the patties are ready to cook, they are pan fried, instead of grilled, similar to a steak. Red wine or another liquid can be added to the par-cooked patties, and they’re finished covered, having absorbed the liquid for extra flavor.

Traditionally, hanbāgu is served topped with a demi-glace sauce, but a red wine reduction or other savory sauce is also commonly served along with rice and vegetable accompaniments.

Mini Hanbāgu are perfect for bento!

Hanbāgu is such a cultural staple and easy to make using our electric skillets. Try our Mini Hamburger recipe for your bentos, and share your favorite way of enjoying hanbāgu!

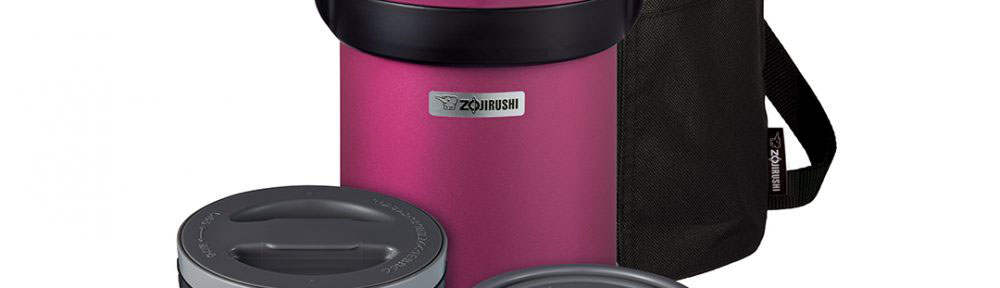
Product Inspirations –
Mr. Bento® Stainless Lunch Jar!
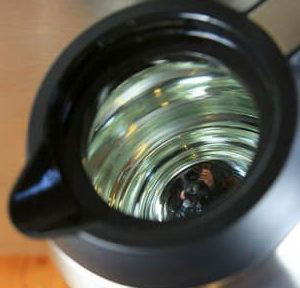
Back to school, back to college, back to autumn routines with work and family and friends!

September is here and we’re excited to make creative meals that we can take to school and work in our Mr. Bento® Stainless Lunch Jar (SL-JBE14). Our Mr. Bento® as a lunch jar, is full of convenient features that allow you to customize your to-go meal experience.

SL-JBE with Carry Bag

This lunch jar has five main components: an Outer Container and four Inner Bowls. The Outer Container provides insulation for 2 of the Inner Bowls and is made using our superior vacuum insulation technology. As with our other stainless products, the vacuum insulation keeps the food inside the Inner Bowls hot or cold for hours.

The four Inner Bowls consist of a Soup Bowl that holds up to 9 oz., a Main Bowl that holds up to 15 oz., a Small Side Bowl that holds up to 7 oz. and a Large Side Bowl that holds up to 10 oz. In total, the bowls can hold up to 41 oz. of food!

The bowls are meant to be stacked in a particular order inside the Outer Container. The Soup Bowl rests at the bottom of the Outer Container. The Main Bowl sits on top of the Soup Bowl and comes with an insulated lid that prevents heat from transferring through, keeping the content of the two bottom bowls at ideal temperature. The two Side bowls sit on top of the Main Bowl, keeping food at room temperature.

Each bowl is microwaveable making it convenient to fill them ahead of time and reheat the food before putting them in the Outer Container. All areas that come into contact with foods are BPA-free.

Once all of the bowls have been placed correctly, the outer lid clips easily into place and keeps all bowls intact.

This lunch jar’s large capacity and multiple Inner Bowls allow you to pack inspired meals! A traditional Japanese ichiju sansai meal, which means “one soup, three dishes” fits perfectly into the Inner Bowls. Western dishes, such as soup, Pasta A’la Zo, salad and dessert also work great, and since September is National Bento Month, kyraben or character bento are ideal!

The Mr. Bento® comes in 4 stunning colors – Plum, Blueberry, Carbon Black and Stainless Steel –and comes with a Forked Spoon and a Carry Bag.

In 4 colors – Plum, Blueberry, Carbon Black and Stainless Steel

Add the Mr. Bento® Stainless Lunch Jar (SL-JBE14) to your lunch box collection and enjoy hot, fresh meals all season long. And be sure to share how you fill your lunch jar…we love the creative ideas you all have!

Design Explained –
Our Original Vacuum Glass Liners

Last year, we celebrated our centennial anniversary as a company, and with you as our customers, we’ve come so far. Founded in 1918 in Osaka, Japan, our company was founded as the Ichikawa Brothers Trading Company, producing vacuum insulated glass liners for carafes. These glass liners were state-of-the-art in 1918, and remain a proven, innovative technology along with our more modern rice cookers, small appliances and vacuum insulated stainless steel products.

Blowing glass by hand

Glass is a surprising material. We encounter it every day in our drinking vessels, windows, jewelry, art and so on. It seems so commonplace but it’s actually a marvel of science and engineering. In its basic form, glass is made by combining silica – one of the most abundant materials on Earth – with other elements in order to produce a material with unique thermal, optical, chemical, mechanical and electrical properties.

Our vacuum glass liners in the Air Pot® dispensers and carafes are made using medical-grade borosilicate glass. Borosilicate glass is made by adding boric oxide, a form of the element boron. Because of it’s unique chemical composition, borosilicate glass is more resistant to thermal shock than regular soda-lime glass, meaning that it won’t shatter or crack when exposed to sudden temperature change. It’s also clear, moldable and easily cleanable, making it an ideal material for glass liners.

Carafe with a glass liner

To make these glass liners, we first create an outer vessel in the shape and size of the carafe or dispenser, then make an inner vessel, which is placed inside the outer vessel. We then coat the interior of the vacuum wall between the two vessels with silver plating to give it heat reflecting properties. Finally the air between the two vessels is removed to create vacuum insulation, which maintains the temperature of the contents of the inner vessel.

Vacuum Glass Liner

Words don’t do the process justice, so check out our video of how our glass liners are made in our factory in Osaka, Japan.

It’s no wonder that we’ve been obsessed with glass liners for a hundred years. We are proud to manufacture quality products for our customers, using this innovative and wonderful material.

Share your favorite Zojirushi product with us, and let us know if you have one of vacuum insulated glass liner products!

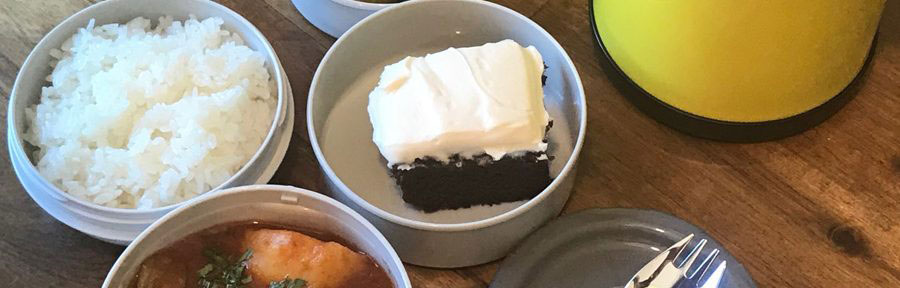
Bert-san’s Take—My Zojirushi Lunch Jar

It’s National Bento Month again! And even though I bring my lunch to work every day anyway, I thought I’d give the Zojirushi Lunch Jar a spin, to see how it really works. Hey, let’s all get behind this great holiday and get some momentum going. We’re supposed to be evolving from the brown paper bag, remember??

Actually, what inspired me to try the Lunch Jar out was the really, really good beef stew that we had the night before. I wanted to bring it for work, so what better way than to keep it hot enough to enjoy at my desk? But that wasn’t all that I was interested in—I wondered how easy it would be to pack everything in the first place, and after I was done, how easy it would be to clean.

I used the largest container for my stew and packed as much rice as I could into the bottom soup bowl. Then my biggest challenge was coming up with what else I wanted to bring to fill up the other 2 containers. Here’s a Zojirushi tutorial on how to use their Lunch Jar:

BTW, did I mention that in Hawaii, we always eat our beef stew with rice? It’s a popular kind of plate lunch, actually, normally served with a side of macaroni salad. Since I couldn’t place a chilled salad inside the jar with my hot beef stew and rice, I added some fruit and a slice of homemade cake in the top 2 containers.

This worked out pretty well—I had some slight melting of the frosting on my cake, but my lunch was still warm, so the jar did what it was supposed to do. And I didn’t mind the fruit being room termperature anyway. I also found the carrying tote bag that comes with the Lunch Jar to be indispensable, and the spoon-fork thing to be handy.

Next up was my chilled test. I again brought our pasta salad leftovers from the night before—looks yummy, right?

I have to say this worked better than the hot lunch; but maybe it was because you really don’t have to keep a salad icy cold—just chilled enough. And it didn’t really matter how cool the other parts of my lunch got; my peanut butter didn’t melt, so I was happy. The top container held a packet of instant miso soup, which was perfect because I couldn’t bring a hot soup with this cold bento. I’ve got access to hot water and paper cups at work, so for me anyway, no problem—I just made the soup there. The spoon-fork wasn’t as useful with this type of food; I just used a plastic fork from our office cafeteria.

Speaking of instant miso soup; if you’ve never tried these, I highly recommend them if you love miso soup and you want some fast. It comes with a packet of real miso paste and a packet of dried ingredients like green onion, wakame seaweed, and dehydrated tofu. Combine them in a cup of hot water, and boom—instant soup!

Just for fun, I tried one more cold bento of cabbage salad, Chinese broccoli, and chicken wings. And using a trick that some of you may find useful, I loaded that bottom soup container with ice. I figured the soup container is leak proof, so it could work as a cold pack for the ice to keep my salad even colder for even longer.

This worked pretty well, surprisingly. I don’t know how often I would need to use this hack, but if you have that extra container available, why not? The ice sits at the bottom, so it kind of acted as a mini fridge for my salad.

Finally, after all is said and done, Did I have fun washing all of these containers? Ha-ha! Since I’m the primary dishwasher at our house, I didn’t think it was a big deal. We handwash everything anyway, and I do believe handwashing is the best way to make the product last longer. Air dry overnight, and it was good to go the next day!

IMHO, the best way to use the Lunch Jar is to plan what you’re going to bring the next day, whether it be a hot or cold lunch, and you can decide for yourself whether your night’s leftovers would work or not. All the containers have to be used to keep everything from rattling inside the larger jar itself, so you may as well find something to pack. The trick is to figure out what to keep temperature controlled, and what to leave room temperature. You might think the containers are too small for you, but trust me, if you use them all for your lunch, the SUM TOTAL of food is plenty for a complete meal. And the best part is that it makes you think about filling them with a balanced, healthy meal, instead of gorging out on one big lunch!


Images by @ironchefmom and Bert Tanimoto