Common Bread Baking Problems

You’ve bought the best breadmaker, and you’ve got great bread making recipes. But it’s just not working out! We understand the frustration of your loaf not quite being picture perfect!  Don’t worry, we can help!  Let’s first make sure our ingredients are fresh, then explore some common bread baking problems, and the steps that can be taken to correct them.

Bread Baking Problems and Solutions

Collapsed or Sunken Loaf (Rising and Falling)

Bread Baking Problems: Collapsed or sunken loaf

Cause: too much yeast, sugar or water, too little salt, or high altitude.

Here’s what you can try doing to improve your loaf: Reduce your yeast by 1/8 to 1/4 teaspoon to start with, and using cold water.  If you see an improvement but it’s still not quite there, continue to reduce incrementally.  Alternatively, you could try increasing salt, or decreasing your sugar or water.

Short, Dense, and/or Dark Loaf

My bread is too dense or dark

Cause: typical of too much flour (or other dry ingredients) or not enough liquid; less often a result of too little yeast, too little sugar, too much salt, or old ingredients.

Here’s what you can try doing to improve your loaf: Reduce your flour* or increasing your liquids.  You can always check your dough during the KNEAD cycle to make sure the texture isn’t too dry.

Lopsided Loaf

Bread problem: lopsided loaf

Cause: typical of too much flour (or other dry ingredients), not enough liquid, or recipe size is too small

Here’s what you can try doing to improve your loaf: Reducing your flour* or increasing your liquids.  If you’re using your own recipe, you may need to increase the recipe size.  The minimum loaf size for our 2 pound bread machines is 1 1/2 pounds (BB-CEC20 and BB-PAC20), and 1 pound for our 1 pound machine (BB-HAC10).

Lumpy Loaf

Breadmaker problem: lumpy loaf

Cause: Typical of too much flour (or other dry ingredients) or not enough liquid

Here’s what you can try doing to improve your loaf: Reducing your flour* or increasing your liquids.  Check the dough during the KNEAD cycle—if it appears knotty or lumpy, you can add a tablespoon of water at a time until a nice, round ball of dough forms.

Unmixed Ingredients

Some bread baking ingredient are unmixed


Cause: The kneading blades were not installed properly, or kneading blades have worn out.

Here’s what you can try doing to improve your loaf:  Installing kneading blades before adding ingredients to the baking pan.  If you suspect they have worn out, take the baking pan out of the bread machine and place the kneading blades on the metal shafts.  Then, try turning the blades with your finger.  Do they catch the shafts and make them rotate?  If one or both doesn’t, it’s time to replace them.

Add Ingredients Didn’t Mix

Bread making ingredients didn't mix

Cause: Typical of too much flour (or other dry ingredients) or not enough liquid.

Here’s what you can try doing to improve your loaf:  Reducing your flour* or increasing your liquid.  When the dough is too dry, add ingredients like nuts and raisins cannot penetrate the dough ball.

*The weight of a cup of flour can fluctuate significantly depending upon how the flour is measured.  Using the measuring cup as a scooper, or pouring flour into the measuring cup will result in more of the ingredient being used than our recipes call for.  You can reduce your flour using one of two methods:

  1. Volumetrically: Fluff your flour with a fork or a whisk to loosen it; then, spoon it into your nested measuring cups, and level off without tapping or shaking.
  2. By weight: Weigh your flour with a digital kitchen scale (128g/4.51oz per cup for bread flour; 120g/4.23 oz for whole wheat flour, and 125g/4.41oz for all purpose).  This method yields the most consistent and optimal results, and conveniently cuts out the guesswork.

Still having trouble, or don’t see your baking problem listed here?  Please contact our customer service team for assistance or give us a message on our Facebook.


B-kyu Gurume: Utsunomiya Gyoza!

Hi, Zo fans!  Welcome back to another B-kyu Gurume blog post!  Today, we’re featuring the beautiful city of Utsunomiya and its delicious cuisine.

Utsunomiya is a city in Tochigi Prefecture, just a bit north of Tokyo.

It’s gorgeous, charming, and home of juicy Utsunomiya gyoza.  Yup.  Those fantastic Japanese dumplings that are oh-so-delicious steamed, pan-fried, boiled, and even deep fried.  We’re checking out Utsunomiya gyoza this month, and promise that by the end of this post, you’ll want to cook up a batch yourself!

Utsunomiya City became the home of gyoza through a few quirks of historical fate combined with concerted effort by city businesses and associations.  Utsunomiya had a base for an army division that previously operated in north-east China and brought back gyoza forbearers, Chinese jiaozi dumplings.  Then the jiaozi dumplings were “Japanized” and made into the softer, smaller gyoza we know and love today.

Well, it turned out that gyoza were great to eat no matter the season!  In cold weather, gyoza were comforting boiler and served with a broth.  In hot weather, pan-fried with a dipping sauce and a cold beer was the way to go.  And this worked out perfectly in landlocked Utsunomiya City, which experiences both weather extremes.  Gyoza became extremely popular in the city, becoming a local staple and economic driver.

These gyoza helped revitalize the city when the other economic pillar collapsed. During the late 1980’s, Utsunomiya City was known as a place to mine oya stone, a beautiful stone quarried from deep in the earth and used for buildings all over Japan. A quarry cave collapsed in 1989, effectively depressing the stone industry in Utsunomiya City. City restaurateurs, business associations and the media decided to highlight their regional gourmet cuisine – gyoza – to revitalize the city’s economy.

And luckily, we all benefit from their plan!

Utsunomiya gyoza come in many sizes and with multiple types of fillings. Commonly, they are filled with regionally sourced pork, cabbage, chives, garlic and salt. When combined and finished into shape, Utsunomiya gyoza are steamed, boiled, pan-fried or deep fried to the diner’s liking.

While they are typically served with a dipping sauce, Utsunomiya gyoza are so flavorful that many enthusiasts prefer eating them without any condiments, letting the juice from the filling permeate their taste buds instead…we’re craving some already!

Utsunomiya gyoza can luckily be found all over Japan, thanks to concerted marketing and distribution efforts by leading businesses in Utsunomiya City. And again, we happily benefit from their plan!

We love these dumplings and are always up for making them using our Gourmet Sizzler® Electric Griddle (EA-BDC10). Do you make your own dumplings at home? Share your recipe and tag us with #zojirushi on Instagram!  And don’t forget to let us know Zo fans, how do you like your dumplings?  Steam, boiled, pan-fried, or deep fried?  Let us know in the comments.

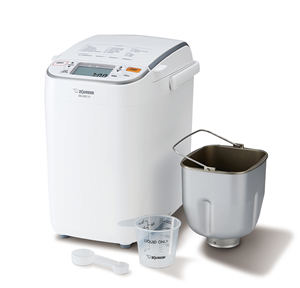
Product of the Month — Home Bakery Maestro® Breadmaker (BB-SSC10)-March 2020

Happy March, Zo fans!  It’s the start of a new month and we’re back with our Product of the Month series.

Our Home Bakery Maestro® Breadmaker is great for any cook, in any size kitchen!

This compact breadmaker is designed to make 1-pound loaves and comes packed with health-conscious menu settings and numerous convenience features that every home cook will love.  There’s so much to love about this breadmaker that we launched a dedicated website with lots of recipes, tips, and videos to help maximize how you use it.  Check out the website but in the meantime, we’re highlighting the most important features about the Home Bakery Maestro® Breadmaker in this month’s blog.

First up, the menu settings.  The Home Bakery Maestro® Breadmaker features a wide selection of 15 course settings, some for breads, some for doughs and other foods, and some for your own recipes.  The 10 bread settings include traditional courses like White and Whole Wheat, as well as new settings for Quick White, Quick Whole Wheat, European, Multigrain, Gluten Free, Salt Free, Sugar Free, and Vegan breads.  Each type of bread is made to perfection because each course setting is programmed to specifically control the kneading, rising, and baking functions for the type of bread to be made, resulting in richly textured bread every time.

The Home Bakery Maestro® Breadmaker also comes with Dough settings for Pizza or Pasta, a course for Cakes and one for Jam.  Plus, it has one of our most unique course settings, called “Homemade”.  The “Homemade” setting lets you store up to three custom programs where you select the knead, rise, and bake times based on your own recipes.  Our fans have made delightful breads and cakes using this superb setting, and we even have an awesome recipe for Meatloaf Miracle!  (You’ll find this recipe in the Recipe Book that comes with the breadmaker).

Along with these great course settings, we have our second highlight: the “Auto Add Dispenser”.  This is a new feature distinctive to the Home Bakery Maestro® Breadmaker and it automatically adds ingredients such as dried fruits and nuts to the dough during the knead cycle.  No need to wait to add extra ingredients manually!

Our third highlight is all about the insides of the breadmaker — the things that make it work so well.  The Home Bakery Maestro® Breadmaker comes equipped with double heaters built into the bottom of the unit.  This type of heating system rapidly heats the interior of the baking pan to facilitate a light and airy bread with a superior crust.  The baking pan is removable, nonstick coated, BPA-free, and holds both dry and wet ingredients.  The single kneading blade, which is secured into the baking pan on a rotating shaft, thoroughly mixes the dough for the best results.

The breadmaker also comes with an easy-to-read LCD control panel and menu that helps you select the course setting and crust color, as well as a 13-hour delay time function.  The baking pan, kneading blade, and Auto Add Dispenser are all removable and washable with mild dish detergent and warm water.  The sturdy handle makes it easy to move and store, and accessories include a full color recipe booklet with 50 delicious recipes, liquid ingredient Measuring Cup, and dry ingredient Measuring Spoon.

Now down to brass tacks…making bread is an art form and there are definitely tricks to perfecting your loaves.  The Home Bakery Maestro® Breadmaker does the heavy lifting, and bread turns out even better when the ingredients are accurately measured.  To make superb bread each time, it’s important to measure ingredients according to recipe instructions.  The best way to precisely measure ingredients is by weight and using a digital kitchen scale, similar to the one shown below.

If a digital scale is not available, you can use the supplied Measuring Spoon for small amounts of powder or liquid ingredients such as yeast, sugar, and salt, and Measuring Cup for liquid ingredients such as milk and water.  Use nested measuring cups for large amounts of dry ingredients like flour.  To learn more, watch our How to Measure Ingredients video on the Home Bakery Maestro® Breadmaker website!

And while you’re there, try out these delicious recipes!  Our favorites are this Whole Wheat Pizza Dough, this Quick Honey Wheat Bread, and this oh-so-delicious Lemon Cake!

And…okay, we lied, those aren’t our only favorites!  We also love Spinach Pasta, Naan, and a Matcha Swirl Bread!  It’s seriously so hard to choose.

Hopefully you won’t have the same issue choosing as we do, and that you love the Home Bakery Maestro® Breadmaker (BB-SSC10) as much as we do.  Share your recipes with us and don’t forget to tag your photos with #zojirushi on Instagram!


Broken Glass Jello

Also known as “Stained Glass Jello”, this was one of my favorite desserts as a kid, when the Aunties would rotate the family potlucks from house to house, from holiday to holiday. It’s up to my cousins’ kids now to carry on that tradition, which I think they’re still doing, but it gets harder as we all start to break away from the Islands. My second cousin (cousin’s kid?) came to visit us for a few days, which was really nice because we were able to catch up on our family in Hawaii. They wanted to go visit the museum in Downtown L.A.—the one with the dinosaur skeleton that greets you at the entrance? It’s something we almost never do, so it was actually very cool!

Here’s all you need to make this dessert. What makes it really special, other than all that color, is the condensed milk gelatin that takes it above and beyond just ordinary Jello.

What I found is that my Zojirushi Water Boiler really did help here. It basically eliminates a step in having to boil water in a kettle, just to add it to the gelatin each time. Don’t forget I’m doing 4 colors plus the white condensed milk for this recipe. AND I can mix the gelatin right in the measuring cup, which eliminated another step of first measuring the correct amount of hot water and adding it to a bowl.

Add hot water (2 cups) directly into a can of condensed milk and 2 packs of gelatin to make the white gelatin.

This is what I mean about mixing the gelatin right in the measuring cup.

After you’ve let all the jello harden in the refrigerator (I think I left it in there for a couple of hours), all you do is take it out and slice into cubes.

Put them all in a large tray (like my glass one here).

Then pour in the condensed milk gelatin, which should have cooled off by now. IMPORTANT! Make sure it’s not still hot because it will melt all the jello!

Refrigerate the whole thing, and…tah-da! Psychedelic Broken Glass Jello…far out man! LOL.

This was so much fun I might do it again, but next time I might want to do something more sophisticated, like the Coffee Gelatin (pronounced “cohee zellee” in Japanese-speak) from the Zojirushi site. Look it up, and try it yourself! For more gelatin recipes using the water boiler, see their Water Boiler recipe page here.


images by Bert Tanimoto and @ironchefmom